
There’s something uniquely nerve-wracking about packing a drum kit and heading out on the road. Unlike a suitcase or a guitar, your set has dozens of fragile parts, each one essential. If you’ve ever zipped open a bag to find a bent cymbal stand or a cracked snare shell, you understand the stakes in travel care for drummers.
For gigging musicians and weekend warriors alike, well-maintained gear means fewer headaches, better sound, and more confidence during every show. A single missing tension rod can derail a performance, while moisture or rough handling can shorten your gear’s life. That’s why understanding travel care goes beyond simple packing techniques.
This guide offers practical, field-tested strategies for keeping your drum kit safe, functional, and performance-ready through any journey. Read on to discover how experienced drummers protect their investment and make setup a breeze, wherever the road takes them.
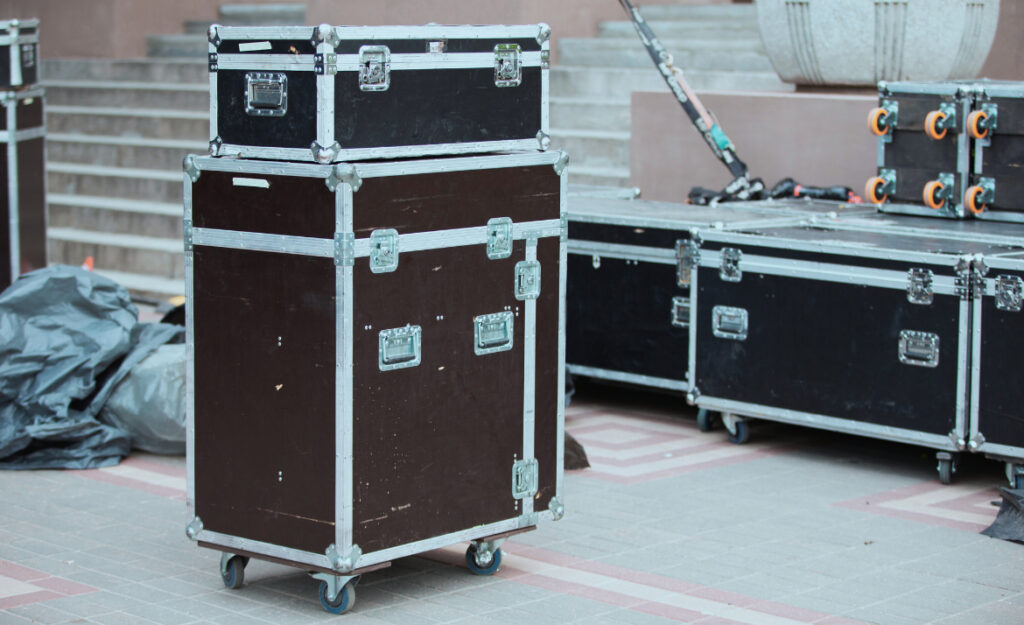
Hard Case Choices That Prevent Costly Damage
Selecting the right case makes sure drums arrive exactly as packed, even after bumpy flights or van rides. Drummers who prioritize hard-shell cases almost never report catastrophic shell or hardware failures, which means uninterrupted gigs.
While soft gig bags might seem lighter and more flexible, they’re no match for an energized baggage handler or a stacked van. Choose molded plastic with beefy latches and foam interior, or road-style cases with reinforced corners when possible.
Case Padding: Layer Up Like a Pro
Inside every shell case, use foam disks, old towels, and cut-to-fit padding. Layering between drum heads and hardware absorbs vibration, spreads pressure, and keeps sweat or humidity off vital parts. Double up on snare baskets and tom mounts.
A drummer packing for a three-show weekend grabbed supermarket towels to wrap each cymbal and tucked socks inside toms to prevent shifting. Every piece reached the stage flawless, and unpacking was just as smooth.
Treat pads like insurance: even if the outside gets dinged, interior shields keep your investment secure. Check for dents after each set and replace any padding that compresses or tears.
Real-World Case Handling Tactics
When you load in, always set case bottoms down—not on their side—so weight doesn’t stress latches or shells. On stairs, lift from both handles with a teammate to avoid internal shifting.
If you notice hardware knocking against a shell, open the case and pad sharp edges or protrusions right away. A veteran drummer put labeled tape on each case so helpers placed them exactly as needed every time.
For added confidence, take photos of packed cases before closing them. If something arrives damaged, you’ll show exactly how things were organized and protected at the start.
| Case Type | Protection Level | Weight | Best For | What to Do Next |
|---|---|---|---|---|
| Hard Plastic Shell | Excellent | Heavy | Checked Air Travel | Measure drums before buying for perfect fit |
| Road Case (Anvil-Style) | Maximum | Very Heavy | Touring Bands | Label hardware slots for quick packing |
| Padded Gig Bag | Moderate | Light | Local Gigs, Car Trips | Add interior towels for extra cushioning |
| Hybrid Soft/Hard Case | High | Medium | Regional Touring | Use for frequent short-distance trips |
| DIY Foam-Lined Box | Varies | Custom | Budget Drummers | Test different foam depths at home first |
Small Parts Organization Rules That Save Gigs
Drum hardware and spare parts vanish without warning unless every item has a designated, secure spot. Smart drummers use labeled organizers, zipper bags, or tackle boxes to guarantee no tension rod or snare wire is ever left behind.
Before, after, and during a performance, mentally or physically check that all hardware is accounted for. This discipline prevents panicked searches fifteen minutes before downbeat.
Use Compartmentalized Cases for Small Parts
Keep a dedicated hardware box with divided compartments for wingnuts, bolts, felts, hi-hat clutches, and extra heads. Mark each spot with tape or marker so anyone can repack quickly under stress.
- Label every section so you can tell if a part is missing with one glance; saves critical prep time.
- Group similar parts together to avoid confusion; place rods and felts near lugs and washers.
- Close all latches and zippers before moving; loose parts can escape and get lost under seats.
- Check the box quietly before every show; makes you ready for onstage emergencies.
- Reset the organizer after packing up to avoid surprises at the next venue.
A clearly sorted organizer helps you spot gaps fast and communicate with bandmates if a spare is needed—”Check the red bin for hi-hat clutch, bottom row.” Having this system is worth the extra minute up front.
Bring a Spare Parts Mini Toolkit
Beside organizers, carry a compact tool pouch with drum key, mini screwdriver, and pliers. Store in the same side pocket every time for muscle-memory access.
- Tuck a round drum key on a lanyard; you’ll never misplace it between soundcheck and set.
- Pack a universal screwdriver for clamps and pedal repairs; speeds up fixes when things come loose.
- Stash compact pliers for tightening bolts or pulling damaged tension rods; less fidgeting gets you back to playing.
- Include a small flashlight for dark backstage corners and roadside repairs; you won’t drop vital pieces due to poor visibility.
- Choose a waterproof pouch for peace of mind when weather turns; water won’t rust tools and let you down mid-tour.
The toolkit should always return to the same case slot after use. This way, even hands full of drumsticks can grab what they need fast without fumbling or forgetting anything essential.
Weatherproofing Every Gig With Low-Cost Fixes
Every drummer will eventually load in during a storm or humid spell. Planning for weather changes saves expensive hardware from rust and keeps shells sounding crisp night after night.
Start by stowing all gear inside waterproof bags if rain is forecasted. Bring extra towels and sealable plastic sheeting to cover cases from van to stage. Travel care means always assuming you’ll get wet someday.
Quick-Dry Practices for Wet Shows
If gear gets damp, towel everything off right away and open cases to air out in a safe, dry spot. Avoid stacking wet cases—it traps moisture inside and damages wraps or finishes.
Position a small fan or use a hair dryer on low to dry pedal chains and metal parts. Afterward, wipe with a low-viscosity silicone cloth, which creates a water-resistant barrier and restores shine.
For indoor gigs near bars or kitchens, always check for spills beneath your kit after setup. Fast cleanup makes sure nothing warps or swells.
Rust Prevention Steps for Hardware Longevity
Wipe all stands and metal parts with a rag after each outdoor show—especially if near saltwater or snowy roads. Rust can set overnight even on “chrome-plated” hardware.
Store silica gel packs inside drum and hardware cases for added moisture absorption. Refresh them monthly for best results.
Lightly oil pedal springs and hi-hat rods before long trips, using dedicated lubricants designed for instruments. Residue from oils not formulated for drums can pick up dust or degrade with heat.
Packing Order Strategies for Zero Setup Stress
A consistent unpacking and packing order is crucial so nothing is forgotten, squashed, or tangled on arrival. Experienced drummers follow a set sequence, refining it over time for their personal kit configuration.
Start with the largest cases and heaviest drums, gradually adding lighter, more fragile items. That way, tension rods and stands don’t shift and cause scratches or bending mid-trip.
“What Goes First” Packing Playbook
In travel care, packing begins with bass drum, toms, and snare—each in their respective case, heads protected with padding. Stands, pedals, and foot hardware get separated next to distribute weight.
Seat all hardware points away from drum shells. Store sticks, brushes, and beaters last, in zipper pockets or side compartments to avoid pressure and snapping.
After packing, run a glance over your open cases and physically check closures. One drummer even uses a short mantra—”Shells, hardware, sticks, close, stack”—to review steps every time before departure.
Staging and Transport Flow
When you arrive at a venue, unload your drum cases first, then set them furthest from traffic. Unpack in reverse-packing order to minimize confusion and steps.
If space is tight, put empty cases against a wall—roll smaller hardware and accessory bags inside to keep everything together. This creates an easy rollout at gig’s end.
For festival gigs, note your stage time and give yourself an extra fifteen minutes to wrestle with stacked backlines. Communicate packing order with any road crew using a checklist taped inside your case lid.
On-the-Road Care Habits That Add Years to Your Kit
Habits formed during routine travel dramatically affect drum kit lifespan. A simple step like wiping fingerprints or consistently checking for loose lugs extends the playable life of every piece.
Adopt two-minute post-show routines—checking heads for cracks and re-packing gear in order—so maintenance never feels like a chore. Travel care is a mindset as much as process.
Sticking to Gear Checks After Every Set
Finish every performance with a slow sweep of your hardware and shells. Tighten loose bolts by hand, inspect for dings or chips, and take photos of suspect areas for reference.
Store these photos in a kit-specific folder on your phone. Next time you notice a change, you’ll have clear records for repairs or warranty claims.
For bigger jobs, jot notes on what you’ll need to fix later—”Snare side hoop ding, tighten pedal spring.” This lets you fix problems before touching down for the next run of shows.
Combining Touring and Home Maintenance
Reserve a pocket in your travel case for cleaning wipes and a tiny bottle of instrument-safe polish. Do a weekly wipe-down, regardless of how “clean” your kit looks.
On rest days, uncase your drums and lay them out. Let them breathe in a well-ventilated room, which helps evaporate hidden condensation and neutralizes mild odors.
Build a habit of switching out drum heads on schedule, not merely when a dent appears. Label your case with marker or tape every time you install a new head to avoid confusion.
Real-Life Challenges: Touring With Vintage or Custom Drums
Older or custom drum kits demand travel care strategies that don’t apply to mass-produced gear. Heavy-duty cases are a must, along with regular pre-trip checks at home.
Original parts may not be available on the road, so pack spares unique to your make or model—like slotted lugs or non-standard tension rods. Photograph your entire kit in daylight as insurance in case of loss or theft.

Talk to Venue Staff Beforehand for Special Considerations
Vintage drums may require climate-controlled storage between sets. Let venue managers know you’ll need a corner away from drafts or heaters, and ask about loading dock access before arrival.
If a club offers coat closets or backstage storage, use them for your cases rather than leaving them unattended on sidewalk or stage wings.
When security is a concern, travel with cable locks. Loop through case handles and anchor to immovable objects for peace of mind while you catch your breath after a set.
Insuring and Registering Your Gear
Keep serial numbers, receipts, and registration details in cloud storage and a physical notebook tucked into your hardware bag. Scan and email copies to yourself and a bandmate for redundancy.
Register your drums with online databases—or a simple spreadsheet for quick identification—so police or venues can help track lost items if needed.
If traveling internationally, check import/export paperwork for rare woods or finishes to avoid custom holds. Print backup forms for re-entry just in case.
Keep Touring Smooth With Pro-Level Travel Care Practices
By using targeted travel care for your drum kit, you set yourself up for years of trouble-free touring and worry-free shows. Every protective habit you develop on the road pays off in performance and peace of mind back home.
No drum, new or vintage, will stay stage-ready without small daily checks and intentional packing. Routine is as vital as gear quality for sound consistency and reliability. Prioritizing these habits avoids last-minute stress and expensive repairs.
Your trip begins the moment you pull cases from the closet or van. By applying smart, proactive techniques with each journey, you’ll play your best every night, secure in the knowledge your drums are safe and ready to shine.