For many drummers, blending acoustic and electronic sounds sparks creative excitement and real-world gigging advantages. Navigating the art of a smart drum trigger setup gives players much more than a technological boost—it changes how their playing connects with audiences and bandmates.
Interest in hybrid drum rigs has soared as acts increasingly slip samples, clicks, and backing tracks under their live sound. Understanding the nuts and bolts of a reliable drum trigger setup matters to everyone from cover band weekenders to main-stage pros.
Below you’ll find real setup rules, troubleshooting tactics, and expressive upgrades—each built for onstage realities and ready-to-try scenarios. If you want a trusted path to tighter, more dynamic hybrid live drumming, walk through each section and build your confidence.
Laying a Foundation: Core Gear Choices That Shape Your Setup
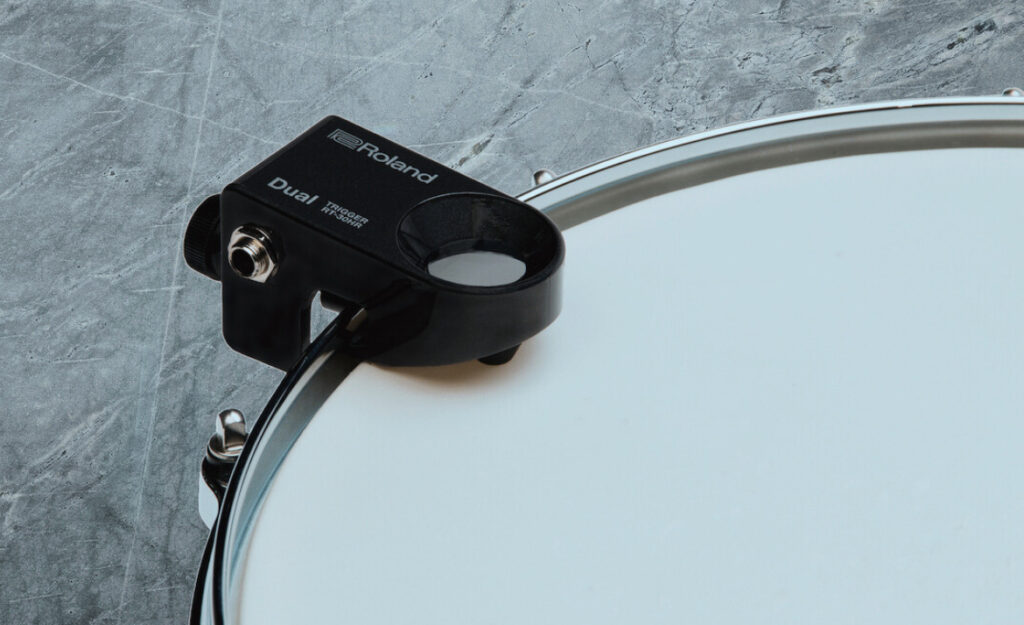
Choosing reliable drum triggers, a sturdy module, and appropriate mounting positions determines your hybrid kit’s flexibility and performance. Each choice impacts signal reliability and the expressive range of your triggers in every show.
Sticking with trusted brands usually pays off, but understanding the distinct behavior of pad, rim, and mesh triggers in the real world helps even more. Aim for a layout that lets you play naturally and adjust sensitively, just as you would with your standard drums.
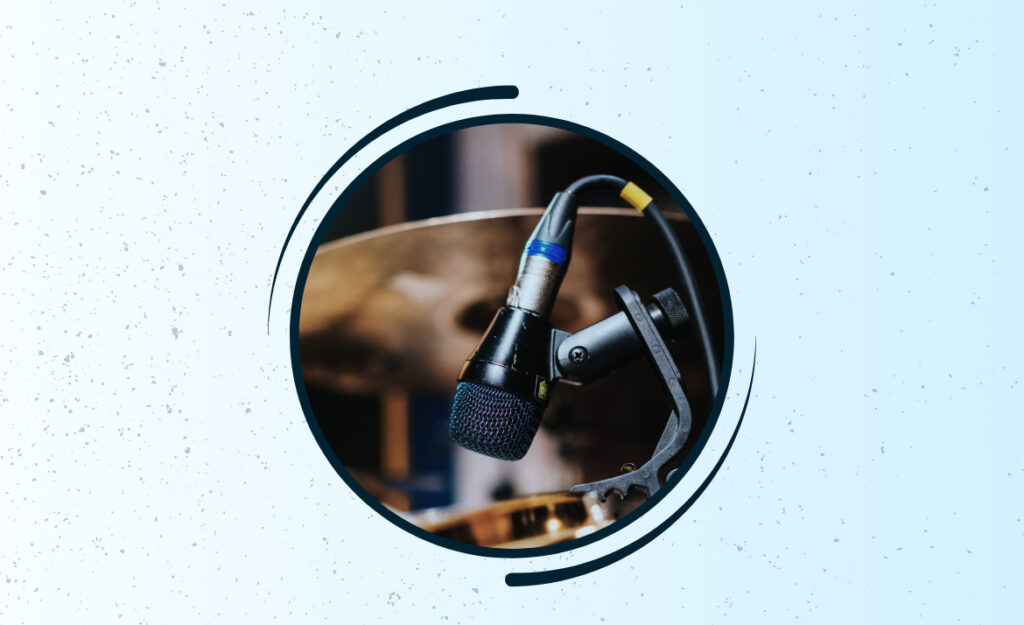
Comparing Trigger Pad Types for Your Musical Needs
Piezo triggers offer sharp response for snare and toms and transduce vibrations cleanly, making them a first pick for most kits. This makes them solid for dynamic fidelity on high-traffic drums.
Foam-head and mesh-pad triggers excel in lower-volume scenarios. They’re also great for practicing late at night or trying intricate ghost notes, since the softer material gives accurate sensing with less stick noise.
Clip-on rim triggers bring versatility—attach or relocate them swiftly between songs. For sample stacks or distinct accent hits, they let you adjust hybrid sounds without rewiring your rig.
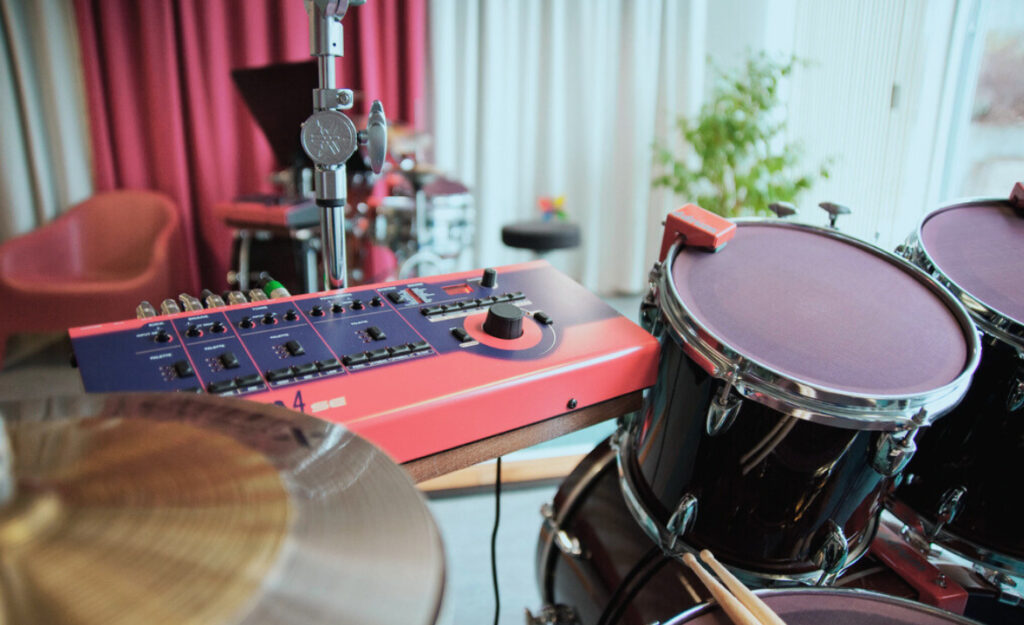
Solid Signal Flow: Matching Triggers to Modules
The cable path from trigger to module is the nervous system of your drum trigger setup. Use shielded cables to cut noise and arrange them so you never trip or kink lines mid-set.
Avoid signal loss by keeping cables short but not over-tight. Label ends for snare, toms, and bass, using colored tape so last-minute troubleshooting becomes quick and stress-free.
Survey your module’s input options. Some entry-level units give four to six pads, but expanding to eight or more inputs allows greater flexibility and gives room for future samples and layer-building.
| Trigger Type | Best Drum | Volume Use | When to Choose |
|---|---|---|---|
| Piezo | Acoustic snare/tom | All volumes | High sensitivity, responsive feel |
| Foam Head | Practice pad | Low/quiet | Silent practice or ghosting |
| Clip-on Stick-on | Rims/cowbell | Medium/loud | Quick switch, versatile position |
| Mesh Pad | Electric kick/snare | Quiet/medium | Dynamic, mesh bounce feel |
| Bar Trigger | Flat surfaces | All | Add samples or triggers away from drum heads |
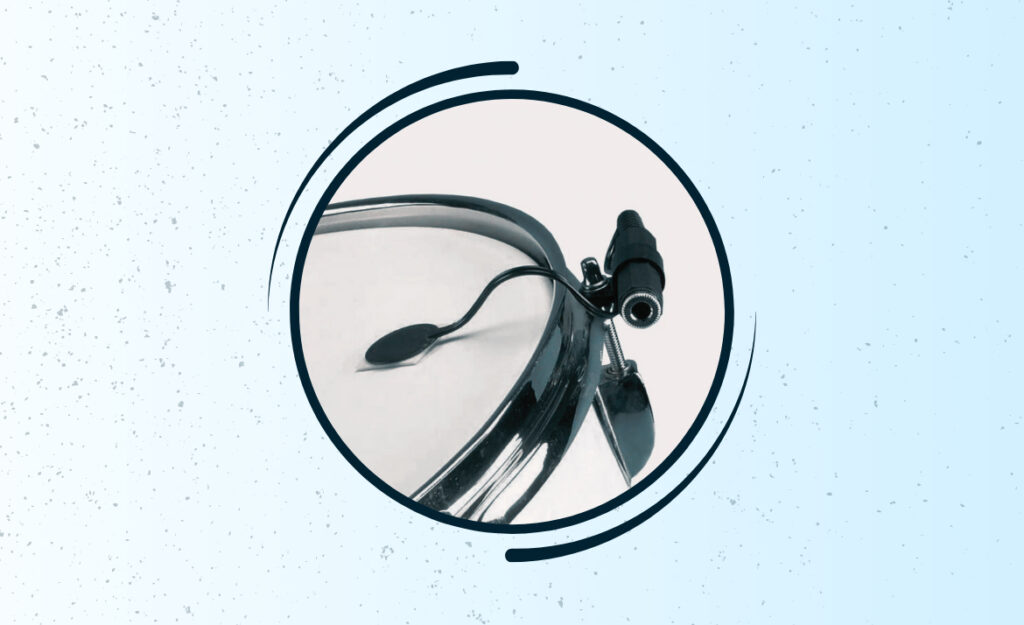
Mounting, Adjustment, and Velocity: Getting Responsive Results
Attaching drum triggers right, setting module sensitivity, and dialing velocity curves creates a setup that feels natural and predictable. Each tweak helps ensure your dynamic nuances translate into the hybrid mix.
Mount triggers where you strike most. Firm, flat surfaces maximize response and minimize cross-talk—unintended triggering caused by nearby hits. Test each drum to check actual trigger spot, not just visual best guesses.
Fine-Tune Trigger Sensitivity for Real-World Dynamics
Access your module’s trigger sensitivity menu and lower the setting so barely-touched hits register, but not extraneous stick taps. This allows subtle ghost notes while blocking hand or stick noise when you reach for mutes.
Raise the threshold only if neighboring vibrations trigger false hits. Keep adjusting until your softest intended notes are clear but random rattles aren’t heard by the rig.
Use the kit’s headphone output during tweaking so you hear every digital layer, then double-check via PA or amp to ensure your live sound mirrors your monitoring adjustments.
- Position each trigger on the flattest, firmest surface—stable contact means consistent, reliable triggering and reduces missed notes during energetic playing.
- Tighten mounts enough to prevent shifting under heavy hits, but don’t over-tighten or you risk compressing sensors. Sweet spot mounting maximizes sensor life.
- Route cables along stand legs and shell braces—reduces accidental unplugging and keeps your setup sleek for rapid changes between sets.
- Label module inputs directly or use colored stickers—quicker troubleshooting means less stress before or during the show.
- Use a drum key or velcro if your trigger’s fit isn’t perfect—improvised padding can eliminate buzzing or sliding on tricky shell surfaces.
Lock down these basics for better feel and fewer headaches—then progress to shaping your actual sounds.
Velocity Curve Adjustments for Expressive Playing
Choose a linear velocity curve for classic, piano-like sensitivity in your drum trigger setup—soft notes sound quiet, hard hits boom. This is best for most acoustic-style drummers joining hybrids.
Want to exaggerate dynamic jumps? Use an exponential curve—gentle strokes stay subtle, but each accent pops dramatically, perfect for electronic swooshes or orchestral crescendos.
Flattened (fixed) curves limit dynamic range but add consistency for triggered samples like claps and electronic kicks, allowing every hit to cut through the mix identically.
Personalizing Your Hybrid Layering: Blending Acoustic and Digital Palettes
Mapping electronic samples and layering acoustic sound gives fresh voice to each kit piece. Balancing those elements creates an experience that feels custom, not canned—tailored for your song list and venue vibe.
Consider the musical context before picking your triggered voices. If you’re matching a pop cover or synth-driven original, assign lush pads or percussion textures to expand your backbeat and fill sonic gaps.
Assigning Sounds That Compliment Your Playing Style
Select digital samples reflecting your personal style. For example, reggae performers may choose timbale or clave hits, while rock players might add gated snares or synth risers for dramatic fills or transitions.
Phrase real acoustic playing to blend with triggers. Example: after a flam-accents snare roll, let a triggered vocal shot or effect follow naturally, extending your groove beyond just drums.
Keep your listening focused on overall groove integration. If samples overpower the drums, re-balance module volumes or swap in gentler sound banks that sit beneath the acoustic signal.
Mixing Approach: Balancing Two Sources Onstage
Treat the acoustic kit as your main flavor and triggers as the seasoning—set electronic volume so it complements without clashing. It’s similar to adjusting reverb or effects in a vocal mix, aiming for support, not dominance.
In a small club, subtle pads or low percussion can lift quieter songs. In bigger halls, punchier samples fill out the sound system’s extra headroom. Choose and adjust for each venue and crowd size.
Define your primary focus for each piece—will the audience notice your hybrid snare, or is the effect meant to stay buried for “feel only” enhancement? Set the level accordingly.
- Layer triggered samples behind acoustic hits to reinforce groove and add impact, especially on choruses or breakdowns that need lift.
- Alternate between digital-only parts and traditional playing to transform a setlist, signaling genre shifts or remix sections.
- Set contrasting samples—sharp woodblock on main beat, shimmering pad on backbeat—for diverse musical moods across your set.
- Use one trigger per foot: allocate synth bass or sub drops to a second kick pedal for rich, dance-ready breakdowns.
- Cycle sample banks during shows to fit changing styles—use footswitches or side-pads for smooth changes between songs without stopping.
Experiment with blends in rehearsal, so your onstage performance feels fluid, not forced—every sound should add, not distract.
Troubleshooting Real-Time Setup Glitches: Fast Fixes for Stage Reliability
Spotting signal hiccups or missed triggers in soundcheck prepares you for problem-free live sets. Running a practical checklist lets you handle surprises without stalling the show or losing your groove.
Build muscle memory for quick solutions so you can address glitches in seconds, not minutes. Practice these moves during rehearsals—musicians and techs both benefit when technology stops being a barrier.
Quick Checks: Immediate Solutions When Gear Misfires
If a trigger doesn’t fire, inspect the cable at both ends for solid connection. Wiggle gently to catch looseness, re-seat with a positive click, then test the pad again immediately.
Sudden double-triggers or jumpy volumes usually trace to shaken mounts or sensitive settings. Adjust mounting pressure, tighten lugs, and re-test so your sound stabilizes before you keep playing.
False triggers from nearby drums mean sensitivity is too high, or crosstalk settings are too low. Lower sensitivity or increase crosstalk cutoff until neighboring hits stop causing erratic sounds.
- Unplug and replug module power for a basic reset—quick reboots often solve module lockup or frozen display issues before you panic about deeper faults.
- Swap cables with a known good line to isolate signal path issues—cable faults disguise themselves as trigger or module faults, so eliminate them first.
- Run sticks around the full drum head or trigger zone—detect any dead spots, which mean repositioning or re-mounting is necessary.
- Check module settings with a printed or digital cheat sheet—knowing your sensitivity, crosstalk, and curve presets helps avoid last-minute confusion onstage.
- Keep spare triggers, mounts, and cables near your kit—a two-minute swap-in beats wrestling a half-working setup mid-show.
By rehearsing basic troubleshooting steps, you’ll stay unflappable, letting music—not maintenance—drive each gig.
Practical Sample Mapping: Building Song-Specific Presets Efficiently
Designing presets and organizing sample banks in advance means you never scramble for the right sound mid-performance. Setting cues for each song lets you focus on groove instead of scrolling through menus under pressure.
Sequence your drum trigger setup so every piece gets useful voices for your actual setlist. Test run each map during rehearsals and mark trouble spots to fix before showtime arrives.
Sample Selection: Matching Tracks with Dynamic Hits
Aim for one main sample per drum per song to prevent overload. For example, use a huge snare verb in an intro, then swap in a percussive clap for the chorus with a single pad hit.
Assign ambient or percussion samples to less-used drums or auxiliary pads. Reserve your main kit voices for staple sounds—kick and snare layers need predictability during fast fills and transitions.
Order samples so each trigger advances the setlist: arrange pads or external switches to cue next song presets with a deliberate tap, mimicking set changes by hand.
Preset Workflow: Making Mid-Show Changes Seamless
Edit and name your module’s song presets with easy-to-read, stage-friendly labels. Simple, short names prevent menu mistakes and let anyone sub in smoothly if you’re switching drummers or sharing gear.
Use a log sheet or phone app to track mapping for each gig, noting which pad or trigger changes sound between songs. This prevents confusion and guarantees consistency from rehearsal to performance.
If you’re using a laptop or inside-control module, pre-program MIDI cues or pad banks that activate during click track sections. That ensures you stay locked with the band, reducing manual menu shuffling.
Expanding Hybrid Expression: Going Beyond the Basics for Creativity Onstage
Once the tech foundation is set, hybrid drummers can push their artistry further with layered FX, real-time sample triggering, and interactive improvisations. Stretch your comfort zone—each gig offers new possibilities.
Integrate electronic textures tastefully. Instead of crowding every filling with samples, use triggered whispers or subtle loops to add emotional context, keeping listeners attentive and invested.
FX Layering: Beyond Standard Snare and Kick
Load atmospheric samples—reverse swells or vinyl crackle—onto less-used auxiliary pads. Strike them during transitions or quiet breakdowns to build anticipation or breathe new life into standard arrangements.
Stack electronic claps under hi-hat chicks to modernize classic funk or disco feels. Try gating or pitch-shifting effects for snare trigger samples, twisting crowd expectations just enough to make them memorable.
Assign melodic sequences or loops to foot triggers, freeing your hands and letting you act as both drummer and secondary synth player. Adjust loop volume and pitch live for natural flow from track to track.
Storytelling With Your Kit: Building Dynamic Journeys
Use changes in triggered sound, volume, and layer density to tell a story in each song. Lead with sparse acoustic hits, then ramp up triggered ambiance as the set grows more intense.
Echo breakbeat or modern pop structures by dropping electronic percussion or sampled vocals in response to crowd reactions. Adapt your mapped pads for real-time “call and answer” with the audience.
Turn extended solos into interactive moments—trigger record-scratch FX or animal noises, playfully responding to audience cheers or band interludes. Every detail personalizes your performance and deepens crowd engagement.
Final Thoughts: Sustainable Hybrid Drum Trigger Setup Success
The strongest drum trigger setup blends creativity, reliability, and flexibility. Thinking ahead, keeping hardware organized, and troubleshooting with purpose lets you focus on musical connection rather than distraction.
A balanced hybrid approach serves the music first. Every module twist, cable route, and sound choice shapes the ensemble’s energy—adding digital color while retaining your core acoustic style builds bands’ and audiences’ trust.
If you treat each gig as an opportunity to evolve, your drum trigger setup will stay both inspiring and bulletproof. Remember: thoughtful setup means fewer tech worries and more spotlight for your music and groove.