When you hear a bass drum that thumps hard and moves air, it’s not luck—it’s skilled use of bass drum mic techniques. The foundation of any energetic groove, a punchy kick, comes from precise mic placement and informed choices.
A lively, controlled low end separates pro-sounding drum mixes from muddy or thin recordings. Musicians, engineers, and home recordists can all benefit from unlocking the subtle moves that deliver room-shaking results, whether in studio or on stage.
Dive into a hands-on guide, filled with clear tips, real-world scenarios, and step-by-step details to turn your next drum capture into a solid foundation for any track.
Choose the Right Mic for Your Kick’s Low End
Selecting your microphone shapes everything about the low end—response, clarity, and fullness. Start here to define your kick drum foundation from the outset.
Every kick mic brings a different set of strengths. Understanding these differences helps you match the tool to your drum, genre, and taste, setting yourself up for consistent results.
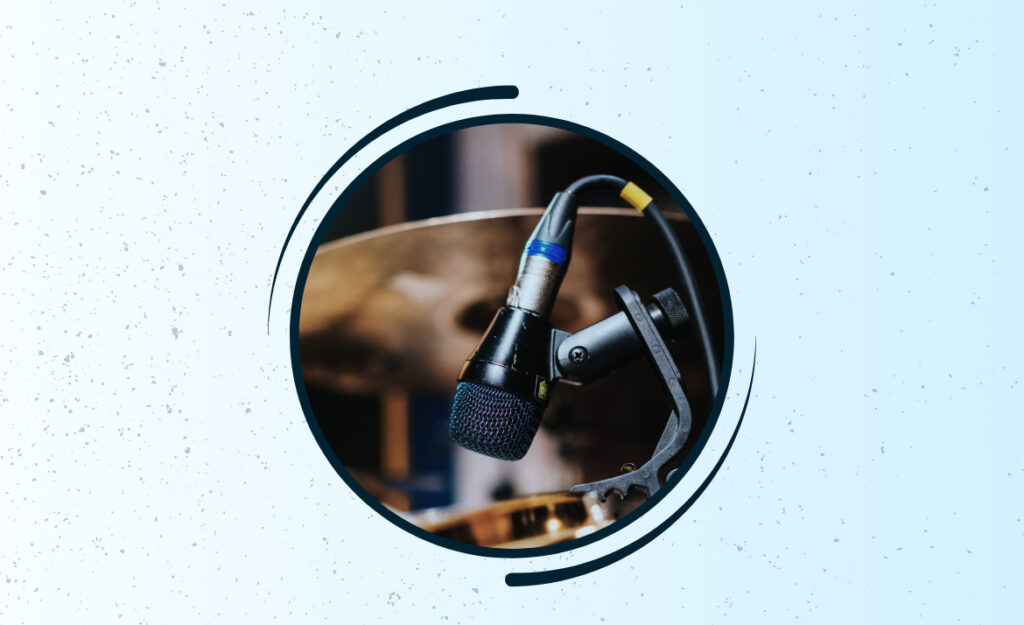
Dynamic vs. Condenser: Impact in Context
Dynamic microphones, such as the classic AKG D112 or Shure Beta 52A, handle high SPLs and deliver focused mids. These are reliable for most live sound applications and punchy studio work where isolation is crucial.
Condenser mics, on the other hand, capture more detail and airy sub frequencies. Place one outside the drum for a fatter tone when the room is quiet. Remember, they’re more sensitive to bleed and boom.
If someone asks, “Should I use a condenser on my kick?”—try both types if you can, blending dynamic for attack and condenser for depth together. Listen for phase problems, then commit to what feels right.
Understanding Small Diaphragm vs. Large Diaphragm Choices
Large diaphragm mics emphasize warmth and body. On a wide-open kick, they give you that classic near-field thud. Place them just outside the port for a balanced, round sound that underpins rock grooves.
Small diaphragm condensers grab more attack and top-end detail, which pops in funk and jazz mixes. Position one alongside a boundary mic to spotlight the beater click while anchoring the lows solidly.
A practical script: Place your large diaphragm outside for body, and tuck a small diaphragm at the beater for definition. Blend until each kick detail jumps through speakers and is felt under your feet.
| Mic Type | Pros | Cons | Best For |
|---|---|---|---|
| Dynamic | Tough, forgiving, tight punch | Less air, focused range | Rock, live gigs |
| Large Diaphragm Condenser | Big bass, smooth attack | Sensitive to bleed, fragile | Studio, big low-end pop |
| Small Diaphragm Condenser | Articulate, fast response | Fragile, less low-end authority | Jazz, acoustic, accenting attack |
| Boundary (PZM) | Flat, phase-free lows | Needs isolation from stage noise | Recording inside shell |
| Sub-Kick | Extreme low capture, deep rumble | Bulky, may muddy mids if soloed | Augmenting standard kick mics |
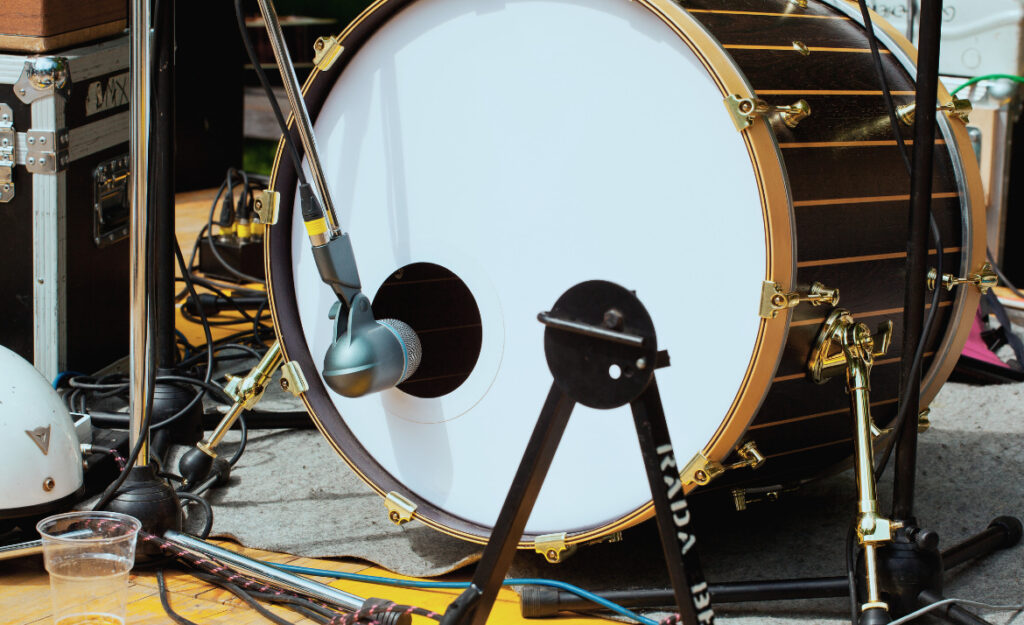
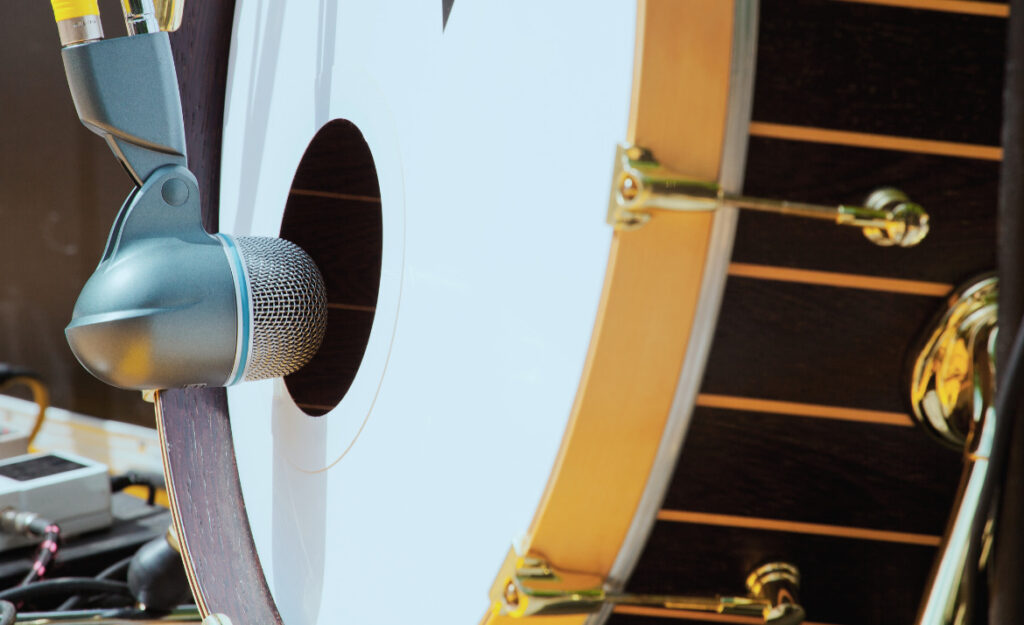
Refine Mic Placement for Consistent Low End Results
Tight, punchy low end is all about controlled mic positions in a bass drum. Tweak your placement, even in small increments, to transform the weight and attack of your drum sound.
Placing the mic just a few inches one way or another can shift your kick from boxy to booming. Use direct listening as you adjust, and lock in where your mix gains mass and clarity.
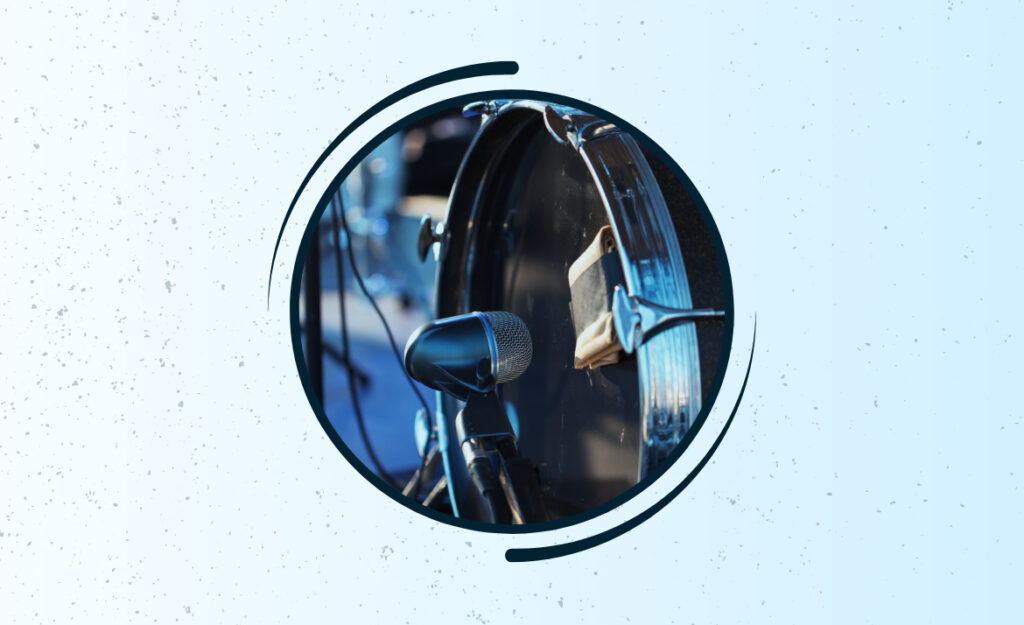
Minimize Bleed and Floor Rumble at the Source
Place kick mics far enough from floor toms and cymbals to avoid picking up harsh overtones. Angle your microphone slightly downward or upward to narrow its focus on the desired zone of the drum head or batter.
- Angle inward for more ‘click’—draws out beater noise that emphasizes groove precision for punchy genres.
- Pull backward for boom—add a few inches back to let lows bloom, but watch for room reflections creeping in.
- Place inside for isolation—go several inches past the shell edge for a drier, direct tone that shines in dense mixes.
- Set flat on a boundary—capture truer bass with less phase distortion for a solid foundation in multi-mic setups.
- Slightly off-center—belly up to the edge of the beater’s impact zone to balance attack with rich resonance.
After dialing in the sweet spot, listen on monitors and headphones. Commit to placement when both hold up in the mix.
Experiment with Dual Miking for Enhanced Control
Use a second mic—one deep inside for attack, another just outside for warmth. Blend their signals to control how much ‘thump’ versus ‘click’ dominates.
- Point one dynamic close to the beater and a condenser near the port—tightens transient snap and broadens lows.
- Flip polarity on outside mic if your mix loses low end—this instantly solves phase cancellation issues for most setups.
- Panning for realism—keep both mics centered for a natural blend or introduce subtle width for modern productions.
- Combine with a sub-kick speaker for extended sub lows—move it several inches from the outer head for deep club vibes.
- Automate blend in your DAW—raise the inside mic for verses, and the outside for choruses to add dynamics to your track.
Use real-time feedback from the drummer: “It feels tight but I’m missing body” means fade the outside mic in gently.
Fine-Tune Drum Tuning and Damping Before You Mic Up
Prepping your drum for miking sets the groundwork for successful capture. The best mics in the world can’t rescue a flabby or boomy kick.
Reduce Overtones and Ring with Smart Damping
Lay a pillow or folded blanket inside the drum, just touching the batter head. This simple move knocks unwanted ring out. Tape a wallet to the head for quick, temporary control in a live jam.
If someone says, “The kick still rings,” try a felt strip or purpose-built damper. Each change shapes the resonance, so listen after every adjustment and balance sustain with punch until your low end firms up.
When tuning, tighten both heads gradually, pressing lightly with measured turns. Say aloud, “The pedal feels snappy and punchy now,” as the drum head stretches evenly underfoot.
Match Tuning to Genre and Playing Style
For rock tracks, lower the batter head slightly and use more damping for that chest-thumping punch. Jazz or acoustic sessions benefit from slightly higher tuning with less dampening, for a long, expressive tone.
Watch the way the pedal rebounds: if it’s springy but not bouncy, your tuning sits in the sweet spot for most modern mixes. Adjust the reso head for extra focus or sustain, as the song demands.
Trust your ear above rules. Every player sounds unique, so move around the drum and test before miking. Copy the pro move: stand facing the kit and snap your fingers near the front head. If lows bounce clearly, you’re ready to mic.
Shape Your Sound with Quick EQ and Processing Moves
Dialing in EQ and compression after recording shapes the character of your bass drum quickly. Don’t rely on raw tracks when a few careful tweaks add definition and cut through the mix.
Apply a subtle low-end boost—kick up around 60–80Hz to accent the thump and add fullness. Remove muddiness by gently cutting the 200–400Hz region, cleaning up space for bass guitar and keys to breathe.
- Use a narrow Q when cutting mids—target boxiness without dulling the drum’s punch, especially on denser pop or rock mixes.
- Add a gentle high-end shelf at 4–6kHz—accentuates beater attack and makes the drum pop on phone or laptop speakers.
- Gently compress after EQ—use a slow attack to let initial punch through, then squash with a 3:1 ratio for modern tightness.
- Sweep with a parametric EQ while looping—find and cut ringy overtones or resonances that cloud the low end.
- Check mix translation—test on small speakers and headphones to confirm your processed kick stays defined everywhere.
If your kick still disappears, copy this recipe: Blend a parallel compression channel, slam it there, and tuck under the dry for enhanced weight that never overwhelms.
Address Common Session Challenges with Real-World Fixes
Every session brings surprises. Maybe the room is too small, the drum too boomy, or other mics pick up excess kick sound. Preparedness with a checklist makes correction fast.
Start with this process: cycle between playing, listening, and moving either the mic or the drum itself. Always monitor with your mix bus chain on, not a dry solo, so you catch mix context early.
Tackle Room Boom and Reflections
If your space is untreated, try moving the kick drum or mic away from parallel walls. Absorb boominess with blankets draped behind the beater head, or tuck bass traps in room corners.
For troublesome floors, set the mic on a rug or foam pad. This dampens low-end buildup that bleeds into other mics or blurs your foundation sound in the mix.
Treat annoying resonances by sweeping your EQ to spot the culprit frequency, then pull it down by 3–5dB. Test again with overheads and mix elements for wider impact.
Handle Stage Spill and Gig Logistics
Live stages introduce bleed from amps, cymbals, and subs. Shield your kick mic with a blanket tent or a short gobo. This step lets low frequencies dominate without clutter from spillover.
If a monitor wedge faces the drum, angle the mic away and use a supercardioid pattern to reject side noise. Communicate with techs early: “Point amp this way, not at my mics,” and your kick cuts through the front-of-house every night.
Take five minutes during load-in to tap the drum, adjust placement, and listen through the PA before the band starts up. This prevents mid-show panic and locks down solid, consistent kick sound regardless of stage setup.
Use Analogies and Mental Models to Nail Repeat Results
Visualizing the drum as a speaker cabinet or a closed room helps when dialing in mic placement for consistent power. Imagine you’re putting your ear where you want the low end to shine, and place the mic there.
If you treat the batter head like the front seat in a car, the sweet spot is just off the driver’s position—not dead center. Adjust mic angle and distance as if you were setting up a coffee shop speaker: aim for warmth, not just volume.
Try the Thirds Rule for Repeatable Setup
Divide the drumhead’s diameter into thirds. Place the mic at the next third off-center from the beater impact zone. This technique balances attack and resonance naturally, just as a well-placed bookshelf splits sound in a living room.
Say to yourself, “Left third, edge of beater—full and clear.” Relying on repeat measurements holds up from session to session and tour to tour, guaranteeing a powered-up kick every time.
Mark your best spots with tape so you can return to them quickly during mic swaps or if you’re sharing rehearsal spaces. Consistency builds confidence among musicians and engineers alike.
Feedback Loop: Drummer and Engineer Collaboration
Real-world sessions thrive when the musician and tech work as a unit. If the drummer says, “More punch, less mud,” kneel by the mic and adjust angle in small increments, watching body cues as they play.
Record two takes—one as is, one with a subtle reposition—then A/B and talk through preferences. Agree on a favored blend, then move forward locked in as a team. Collaboration drives repeatable, crowd-pleasing results.
Make it routine: Establish a five-minute soundcheck script where player and engineer swap roles, listening and coaching each other until both thumbs go up. The groove always hits harder with shared intent.
Transform Your Kick Drum Sound With These Proven Tactics
Smart bass drum mic techniques set the stage for mixes that pulse with authority—not by chance, but by choice. Choosing the right microphone and placement gives every session a head start.
Tuning, damping, and processing shape the remaining details. Fix challenges with simple, direct actions, not guesswork. Over time, repeating successful moves ensures your bass drum always anchors the music.
The best results emerge through focused listening, team feedback, and adapting proven ideas to your songs. Carry these strategies into your next rehearsal or recording and feel your drum sound rise to the occasion.