
Picture that first, uncertain moment before a drum pad: hands poised, sticks ready, but something feels off. Achieving control requires understanding how to hold drumsticks with precise intent and relaxed technique.
Too tight a grip and your wrists ache, too loose and the sticks fly. The way you hold drumsticks affects every stroke, rebound, and flourish, connecting your intent to the kit’s sound.
Read on for tested grip rules, actionable steps, and practical comparisons to help you develop a stable, confident, and adaptable stick hold from your very next practice.
Grips That Shape Your Foundation: Choose With Intention, Not Habit
Adopting the right grip sets you up for cleaner technique, fewer injuries, and flexible playing style. Whether you play drum set, snare, or percussion, the grip is your direct link to the instrument.
Many drummers start with what’s comfortable at first. But taking a few minutes to review common grips, finger placement, and wrist angles lets you pick the approach that suits your music and goals.
Matched Grip: Start Strong With Balanced Control
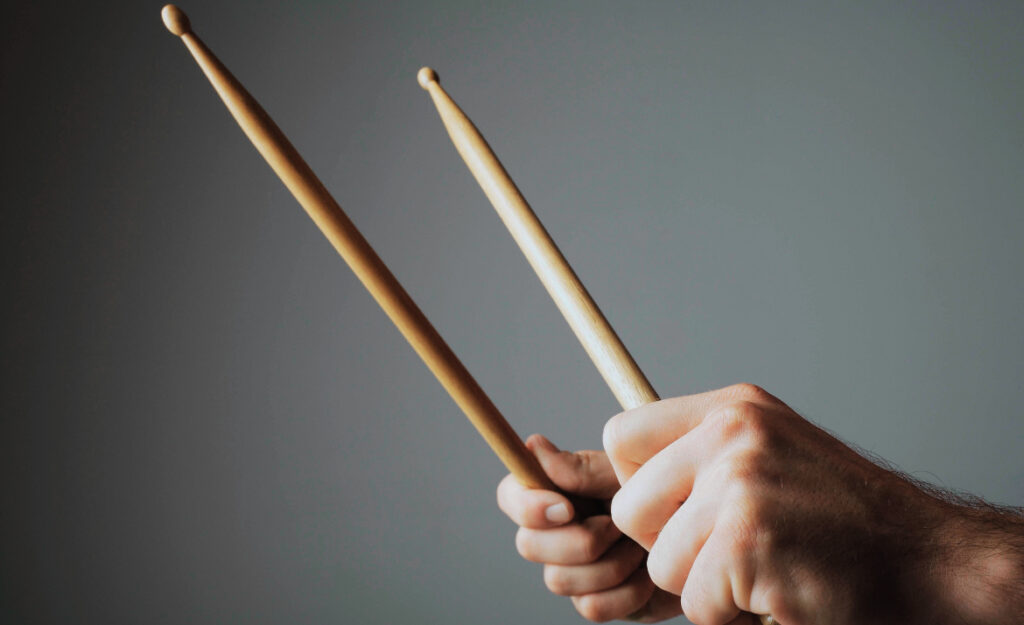
Matched grip means both hands mirror each other. Hold drumsticks between thumb and first knuckle, letting the stick rest on the lowest part of your index finger and supported by the thumb.
The rest of the fingers wrap gently, supporting the stick without squeezing. Wrist stays loose—think of holding a small paintbrush you’d use for writing, not a hammer.
Benefits include even stroke heights, natural rebound, and easy transition between drums. Many rock, pop, and beginners prefer matched because it’s intuitive and easy to check for mistakes.
Traditional Grip: Explore Subtlety and Delicate Touch
Traditional grip holds the left stick palm-up, nestled in the web between thumb and index finger while other fingers support. Right hand uses the matched approach.
This style gives a light, precise feel, ideal for jazz, marching snare, and intricate brushwork. Left wrist is rotated to allow possible finesse.
Adopting traditional grip asks you to be mindful of wrist rotation and finger engagement. It brings a nuanced rebound and lends itself to expressive dynamics and stylistic flourishes.
| Grip Type | Hand Position | Genres Suited | Key Benefit | Actionable Takeaway |
|---|---|---|---|---|
| Matched Grip | Both hands identical | Rock, Pop, Metal | Balance & Power | Check thumbs align on top; adjust for even volume |
| Traditional Grip | Left palm up, right like matched | Jazz, Marching, Latin | Subtlety & Expression | Practice slow rudiments to refine finger use |
| German Grip | Palms down, wide arms | Orchestral, Classical | Strong rebound | Rotate wrists for power without tension |
| French Grip | Thumbs on top, palms facing each other | Speed, Soloing | Finger control | Let stick rest on thumb, guide with index |
| American Grip | Hybrid, slight palm angle | Modern Drum Set | Versatility | Adjust wrist for both finesse and power |
Finger and Wrist Engagement: Build Agility, Not Just Strength
Developing your grip isn’t only about palm placement—it’s about coordinating fingers and wrist for dynamic control. Balanced engagement means you play longer with smoother motions.
Tension creeps in slowly. Check your hands throughout each session: your hold on the drumsticks should feel more like cradling a bird than carrying a heavy bag.
Fine-Tuning Finger Involvement
Each finger manages bounce and velocity. The thumb and first finger become pivot points, while the other fingers act as guides and shock absorbers, letting you adjust on the fly.
- Let the middle finger help the stick rest naturally, giving extra stability but not squeezing tightly.
- Use ring and pinky for minor corrections, closing slightly during faster or accented strokes.
- Check hand shape by tapping the stick with your opposite hand—the tip should rebound easily with little snare rattle.
- Avoid forcing your fingers to clamp down; lighten the grip during doubles or rolls for best rebound.
- If calluses or pain appear, reassess finger placement immediately to avoid ingraining poor technique.
Frequent micro-adjustments lead to relaxed hands and confident transitions between patterns or rudiments.
Tuning the Wrist for Smooth, Responsive Motion
- Bounce using the joint above the wrist, letting the hand act as a spring for quick passages.
- Loosen grip just before an accented note to allow natural stick rebound off the drum surface.
- Keep wrists level with the snare for matched grip; gently rotate in traditional grip to avoid overextension.
- Alternate slow, open strokes with sharp accents to enhance coordination and avoid stress.
- Monitor for tightness: if your hands feel locked, shake out, regrip with fingertips, then resume playing.
Use these wrist checks every few minutes during practice for sustainable, expressive drumming.
Adjust Grip for Volume Swings: Play Quiet and Loud Without Losing Precision
Changing how you hold drumsticks allows quick shifts between soft ghost notes and bold rimshots. Control volume without sacrificing feel by making micro-adjustments, not drastic switches.
Tapping softly on a snare, you might loosen your grip, letting rebound float. Powerful hits demand more supportive fingers, not more downward force.
Low Dynamics: Retain Touch While Dialing Down Force
Light grip with gentle finger wrap creates delicate taps, ideal for jazz comping and intricate ride patterns. The wrist stays nearly flat, with just enough tension to keep sticks from wobbling.
Try ghost notes: Hold drumsticks closer to the middle, increasing stick control and reducing arm motion to match your volume to the ensemble.
Let rebound do the work; at low volume, your only job is to guide the stick’s motion and steer it away from unwanted overtones.
High Dynamics: Anchor the Stick as Force Increases
When volume rises, grip shifts slightly—fingers wrap tighter, anchor points (thumb and first knuckle) press more firmly, and wrist height adjusts. Use forearm for support, not brute strength.
Snappy rimshots and accents emerge when the grip stays firm but wrist and shoulder remain agile.
Don’t choke the stick; check for fatigue after several loud phrases. Adjust thumb position or temporarily shake out tension for sustained power.
Practice Drills That Reinforce Good Grip Habits Every Session
Daily routines build reliable muscle memory. Refine your grip by making stick checks, motion drills, and groove practice part of your warm-ups and cool-downs—small steps that collectively boost your drumming.
Use practice pads, pillows, or snare drums. Each surface highlights a different aspect of holding drumsticks, revealing if you’re controlling rebound or fighting against it.
Grip Inspection Check: Start and End Your Sessions Right
Place your sticks on a table. Pick them up, deliberately positioning thumb and fingers before playing a note. Check alignment and comfort. Start slow to sense subtle tension or misplacement.
Do this stick check again post-practice to confirm if fatigue or excitement altered your grip. Note differences for future sessions to steadily refine your approach.
Small rituals like this develop awareness, preventing the drift of bad habits over time.
Controlled Rebound Drills: Hone Finger and Wrist Dynamics
Try singles, doubles, and buzz rolls at varying speeds. Keep focus on how the stick rebounds—hold drumsticks lightly at first, then vary grip pressure mid-exercise to sense changes in response.
Alternate hands every two bars, monitoring sound and feel. Any buzzing, fluttering, or extra stick noise marks a spot for further grip adjustment.
Repeat daily, gradually increasing complexity or volume to practice flexibility in your hold.
Common Pitfalls and Quick Fixes for Better Grip
Addressing small problems early makes improvement automatic. Drummers tend to tense up unconsciously or miss subtle signs of fatigue—correcting these issues eliminates frustration and keeps your technique healthy.
Being proactive means doing spot checks before, during, and after practice to catch creeping tension, uneven stick heights, or pinky-finger fatigue, which can undermine sound and stamina.
- Use a mirror to watch both hands simultaneously; compare wrist height and knuckle alignment before starting faster passages.
- Film yourself for later review, focusing on what changes when switching between grips or dynamic levels.
- Deliberately switch grips every few songs or rudiment types to stay adaptive and avoid rigidity.
- Avoid squeezing—if you notice calluses by the second finger, pause and grip the stick a centimeter closer to the butt end.
- Rotate hand stretches and brief finger massages into your warm-up, preventing cumulative tension.
If a sticking point persists, slow down and experiment with minor finger repositioning, tapping the stick gently until rebound feels natural again.
Minute-to-Minute Adjustments: Stay Responsive in Live or Studio Settings
Live drumming and recording demand real-time grip shifts. Adapting on the fly prevents fatigue and sharpens your musical phrasing—hold drumsticks securely, yet keep flexibility to tweak things measure by measure.
During a set, a drummer might whisper, “tighter here, looser there” as the band’s energy ramps up or winds down—a mental check that keeps playing consistent and enjoyable.

Visual and Tactile Cues for On-the-Spot Grip Tweaks
Glancing at the tips and beater angles confirms balance mid-song. If your right stick taps rims more than the left, ease grip and shift wrist angle until strokes match.
Sweaty hands signal it’s time to lighten pressure, especially with hickory or nylon sticks. Wipe hands, readjust hold, and continue, aiming to maintain articulation despite moisture.
When a fill calls for X-stick, briefly shift thumb underneath for leverage, then return to regular grip without missing a beat.
Band or Studio Cues: Adapting to Feedback Instantly
Recording engineers may ask, “More ghosting on the snare?” or “Keep rimshot accents even.” Respond by repositioning index and middle finger subtly to balance left and right hand volume.
Bandleaders notice fatigue if your fills lag—drop grip pressure slightly and reset wrists between songs. Use downtime for micro-stretching fingers and wrists, then check grip as you begin the next track.
Review video or audio playback, then commit new grip micro-adjustments to muscle memory during rehearsals.
Bring Consistency to Every Performance: Precision From Practice Room to Stage
Reliable drumstick grip translates directly to musical authority. Audiences, recording engineers, and fellow musicians sense your control, whether you hold drumsticks for a relaxed jazz sweep or a sharp rock backbeat.
Integrate grip checks into soundcheck, rehearsal, and home practice, always asking: Is this comfortable? Does rebound work for or against me? Are my accents deliberate, never accidental?
Small steps—mirrored hand checks, deliberate practice drills, micro-adjustments—yield noticeable improvements in technique and consistency, from casual jams to headline gigs.